Breaching & Hardening Active Directory

Introduction
Two TryHackMe rooms back to back, deliberately in that order: Breaching Active Directory first, which walks through five separate ways of getting that first set of AD credentials, then Active Directory Hardening, which walks through the mitigations for exactly that kind of breach. Both are instructional rooms rather than puzzles, they show the technique and the exact steps, and the job is working through them hands-on rather than discovering them cold. I’m covering both together here because reading them back to back is genuinely more useful than either alone: attack, then the specific control that would have stopped it.
Breaching AD is a full network (a domain controller, an IIS server, a printer, a PXE deployment server, a jump host), practiced from the terminal. Hardening AD is a single Windows Server 2019 box, worked through mostly in Group Policy Management Editor’s GUI. Real AD credentials, hashes, and flags get redacted below the same as anywhere else on this blog.
Theory
Active Directory runs an estimated 90% of Fortune 1000 companies, which is the whole reason both rooms matter: if an organization runs Windows, AD is almost certainly managing identity and access for the entire estate. A domain is the core administrative unit, holding the objects (users, computers, groups) that belong to it. A domain controller is the server that actually authenticates and authorizes everything in that domain. Trees let domains share resources with each other via trust relationships, and a forest is a collection of trees sharing a common schema and global catalog. None of the breaching techniques below need domain admin, or any privilege at all, any account that can authenticate is enough to start enumerating AD further.
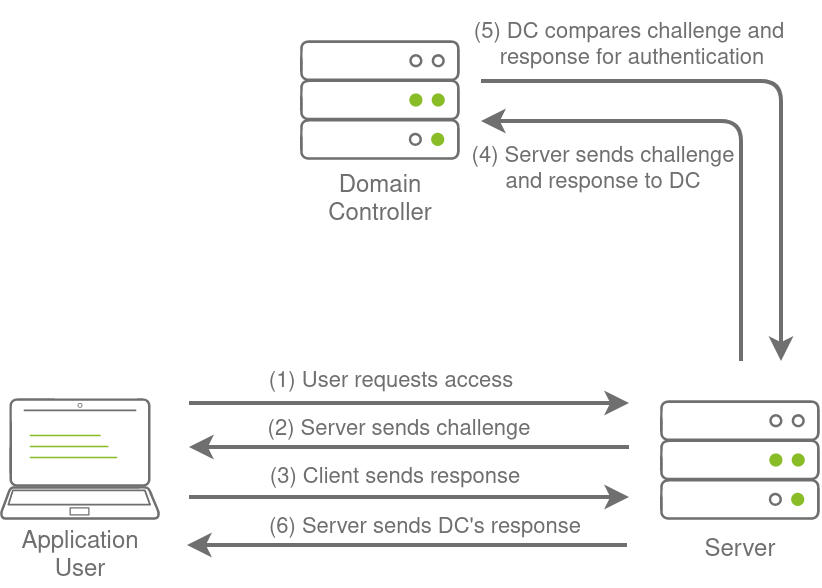
Two authentication mechanisms come up repeatedly: NTLM (specifically NetNTLM, a challenge-response scheme where an application forwards authentication material to a domain controller on the user’s behalf) and LDAP (where the application holds its own set of AD credentials to query and verify against LDAP directly, which is why LDAP-authenticated apps leak a service account, not just a user’s session).
Part 1: Breaching Active Directory
NTLM password spraying
An OSINT exercise (not practiced hands-on, just named as a credible source in the room) turned up a list of employee usernames plus the organization’s default onboarding password. Real account lockout policies rule out a full brute-force, so the actual technique is a password spray: one password, tried against every username, instead of many passwords against one account. A small Python script did the spraying against an internet-facing app that supports Windows Authentication:
1
python3 ntlm_passwordspray.py -u usernames.txt -f za.tryhackme.com -p Changeme123 -a http://ntlmauth.za.tryhackme.com/
The script reads the HTTP status code per attempt, a 401 means the pair failed, a 200 means it worked, and it worked for a handful of accounts still sitting on the default password months after onboarding.
LDAP pass-back via a printer
A network printer’s web admin interface needed no login at all, and its settings page showed the LDAP bind username used to authenticate the printer to AD, but not the password, that field only accepts input, it never displays what’s already stored.
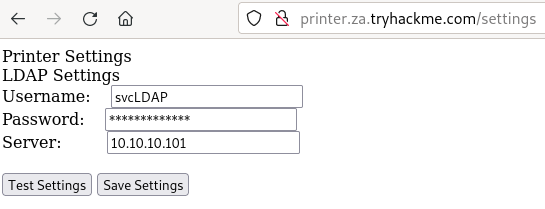
Pressing “Test Settings” makes the printer connect out to the configured LDAP server to verify the credentials work, which is the actual opening: point that server field at your own IP instead, and the printer authenticates to you.
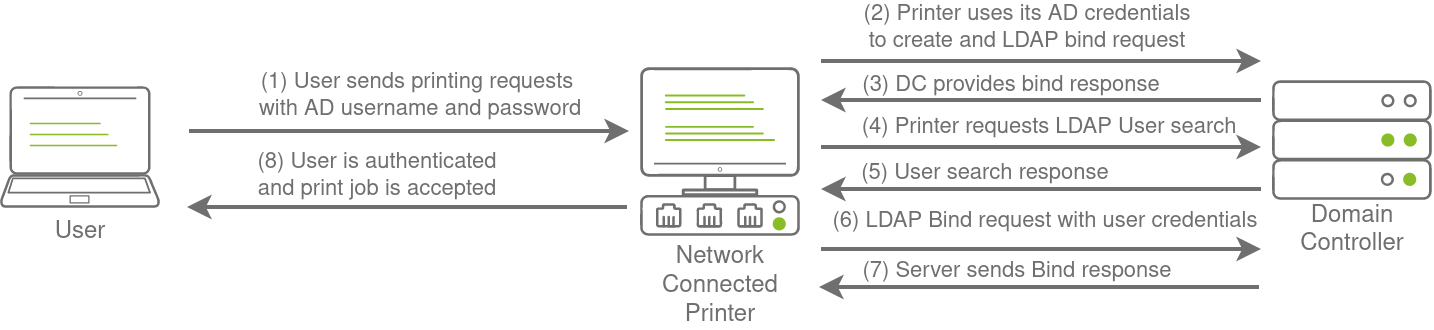
A plain nc -lvp 389 catches the connection, but only gets as far as an LDAP capability negotiation, the printer and the real LDAP server would normally agree on the strongest mutually supported auth method, and a strong one never sends the password in the clear at all. The fix is standing up a rogue OpenLDAP server and deliberately downgrading what it advertises:
1
2
3
4
# olcSaslSecProps.ldif
dn: cn=config
replace: olcSaslSecProps
olcSaslSecProps: noanonymous,minssf=0,passcred
1
sudo ldapmodify -Y EXTERNAL -H ldapi:// -f ./olcSaslSecProps.ldif && sudo service slapd restart
With only PLAIN and LOGIN advertised, minimum security strength forced to zero, the printer’s next “Test Settings” click authenticates in cleartext. A tcpdump -SX -i breachad tcp port 389 running at the same time catches the bind attempt on the wire, and the LDAP bind DN plus password for the svcLDAP account show up directly in the packet bytes: [redacted].
Capturing and cracking with Responder
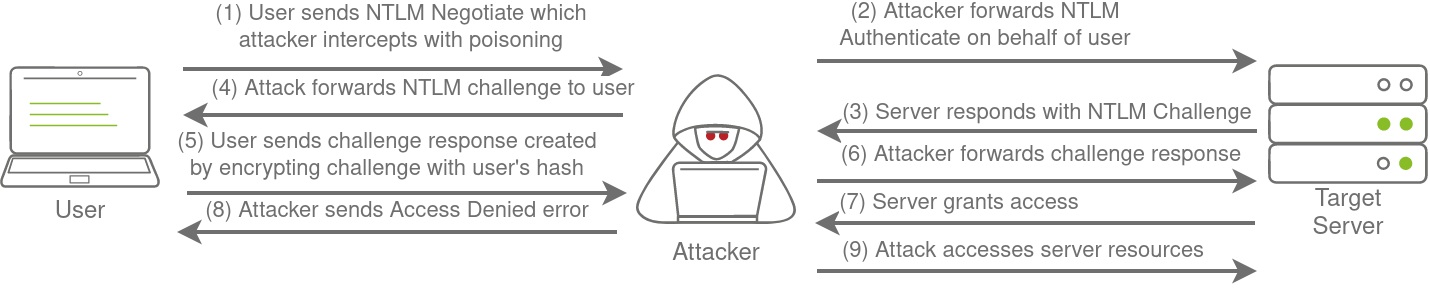
SMB’s own NetNTLM authentication is the target here, but from the network’s perspective rather than a single app’s login form. Responder listens for LLMNR, NBT-NS, and WPAD broadcast traffic, the local-network name-resolution protocols hosts fall back to before hitting real DNS, and answers them with “that host is me” whenever a lookup comes through it wouldn’t otherwise see.
What Responder actually is
Responder is an open-source Python tool built specifically to abuse the fallback name-resolution protocols Windows hosts use. When a normal DNS lookup fails, a Windows machine doesn’t just give up, it asks the local network directly via LLMNR or NBT-NS, “does anyone know this hostname?” On a network with a lot of hosts, mistyped hostnames and stale DNS records make this happen constantly. Responder sits on the network answering every one of those broadcast questions with “yes, that’s me,” then spins up its own fake SMB, HTTP, SQL, and other servers to actually receive the connection that follows. Whatever service the victim host was trying to reach, Responder impersonates it well enough to make the client start authenticating, and that’s the point where the NetNTLM challenge and response get captured. It can’t recover the plaintext password directly, NTLMv2 responses are one-way hashes, but the captured challenge-response pair can be cracked offline exactly like any other password hash.
1
sudo responder -I breachad
A simulated authentication attempt against the network (standing in for the kind of stale-DNS-record traffic that would hit a rogue device on a real LAN) lands an SMBv2 NTLMv2-SSP challenge response in Responder’s output, hostname, username, and the challenge hash together.
That hash goes straight into Hashcat against a provided wordlist:
1
hashcat -m 5600 <hash file> <password file> --force
Hashtype 5600 is NetNTLMv2. The password cracked out clean: [redacted]. The room also covers relaying the challenge instead of just capturing it (the diagram above shows that variant), useful when SMB signing isn’t enforced and the account has real permissions on the target, but that needs enough foothold-first enumeration to know which account is worth relaying, so it stays a “how it works” explanation here rather than something practiced blind.
Microsoft Deployment Toolkit and PXE boot
MDT lets an organization PXE-boot new machines straight into a preconfigured OS image over the network, no USB drive, no tech physically visiting every desk.

That convenience is also the attack surface: the boot image itself can carry a deployment service account’s credentials, meant only to reach back to the MDT server during install, not to be extracted afterward. Working from an SSH session on the jump host, the first pull is the BCD (Boot Configuration Data) file over TFTP, TFTP has no directory listing, so the exact filename has to be known upfront, it’s visible directly on the MDT server’s own web listing:
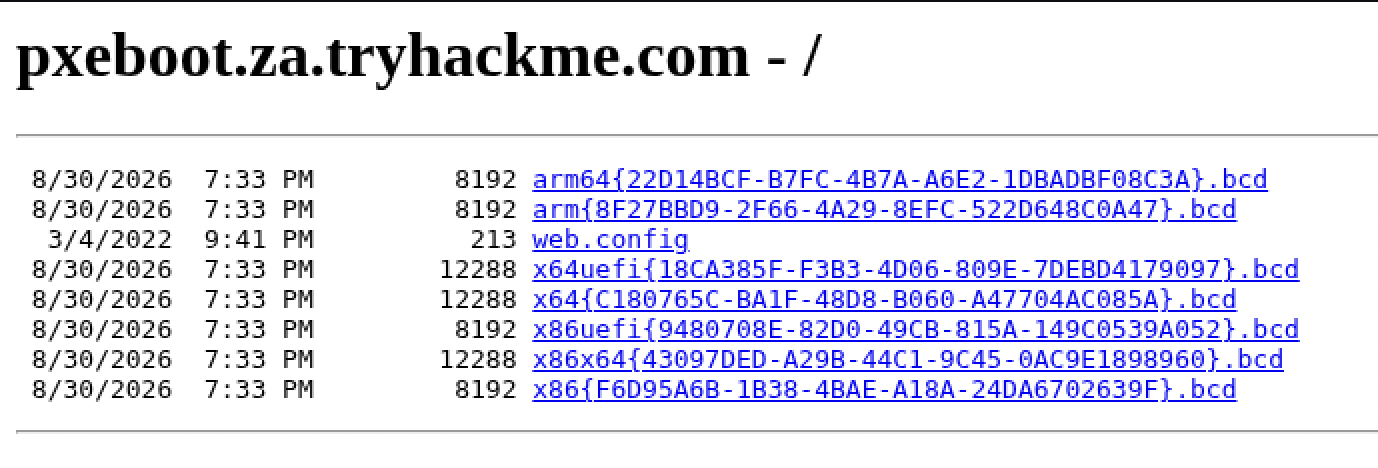
1
tftp -i <THMMDT IP> GET "\Tmp\x64{...}.bcd" conf.bcd
What PowerPXE actually is
PowerPXE is a PowerShell module built specifically to automate attacks against insecure PXE boot deployments like this one. On its own, a BCD file or a multi-hundred-megabyte WIM image isn’t something you’d want to pick apart by hand, BCD is a binary format Windows itself uses to store boot configuration, and a WIM is a full compressed disk image. PowerPXE wraps that parsing into a couple of functions: Get-WimFile reads a BCD file and returns the path of the actual boot image referenced inside it, and Get-FindCredentials opens a WIM file and searches it specifically for bootstrap.ini and similar MDT configuration files, the ones that carry the deployment share’s login details for an unattended install. It doesn’t discover a new vulnerability, it automates finding and reading that file once you already have the image.
PowerPXE reads that file to find where the actual bootable image lives, then a second TFTP pull grabs the full .wim (Windows Imaging Format) file:
1
2
3
4
Import-Module .\PowerPXE.ps1
$BCDFile = "conf.bcd"
Get-WimFile -bcdFile $BCDFile
tftp -i <THMMDT IP> GET "<PXE Boot Image Location>" pxeboot.wim
The credentials sit inside bootstrap.ini, the file MDT uses to configure an unattended install, packed inside the .wim. PowerPXE pulls it straight out:
1
Get-FindCredentials -WimFile pxeboot.wim
Deploy root, domain, username, and password all come back in one shot: [redacted]. Of the five techniques in this room, this was the one that surprised me most, a boot image meant to configure hundreds of new machines unattended carries a live service account inside it by design, and anyone who can reach the PXE server over the network can pull that image down and read it.
Configuration files: McAfee’s local credential store
The last avenue assumes host-level access already, and asks what’s sitting in configuration files once you have it. Centrally managed security tooling is a good target here specifically because it needs its own credentials to phone home to its management server. McAfee’s endpoint agent keeps exactly that in a local SQLite database at C:\ProgramData\McAfee\Agent\DB\ma.db. Pulled off the jump host via scp and opened in sqlitebrowser, the AGENT_REPOSITORIES table carries DOMAIN, AUTH_USER, and AUTH_PASSWD columns alongside repository metadata:
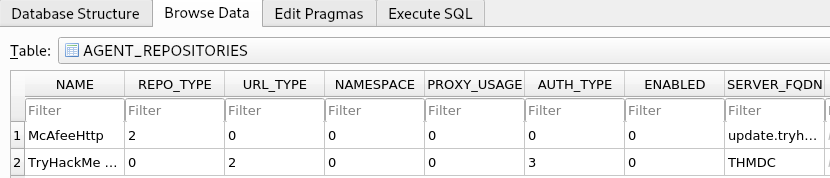
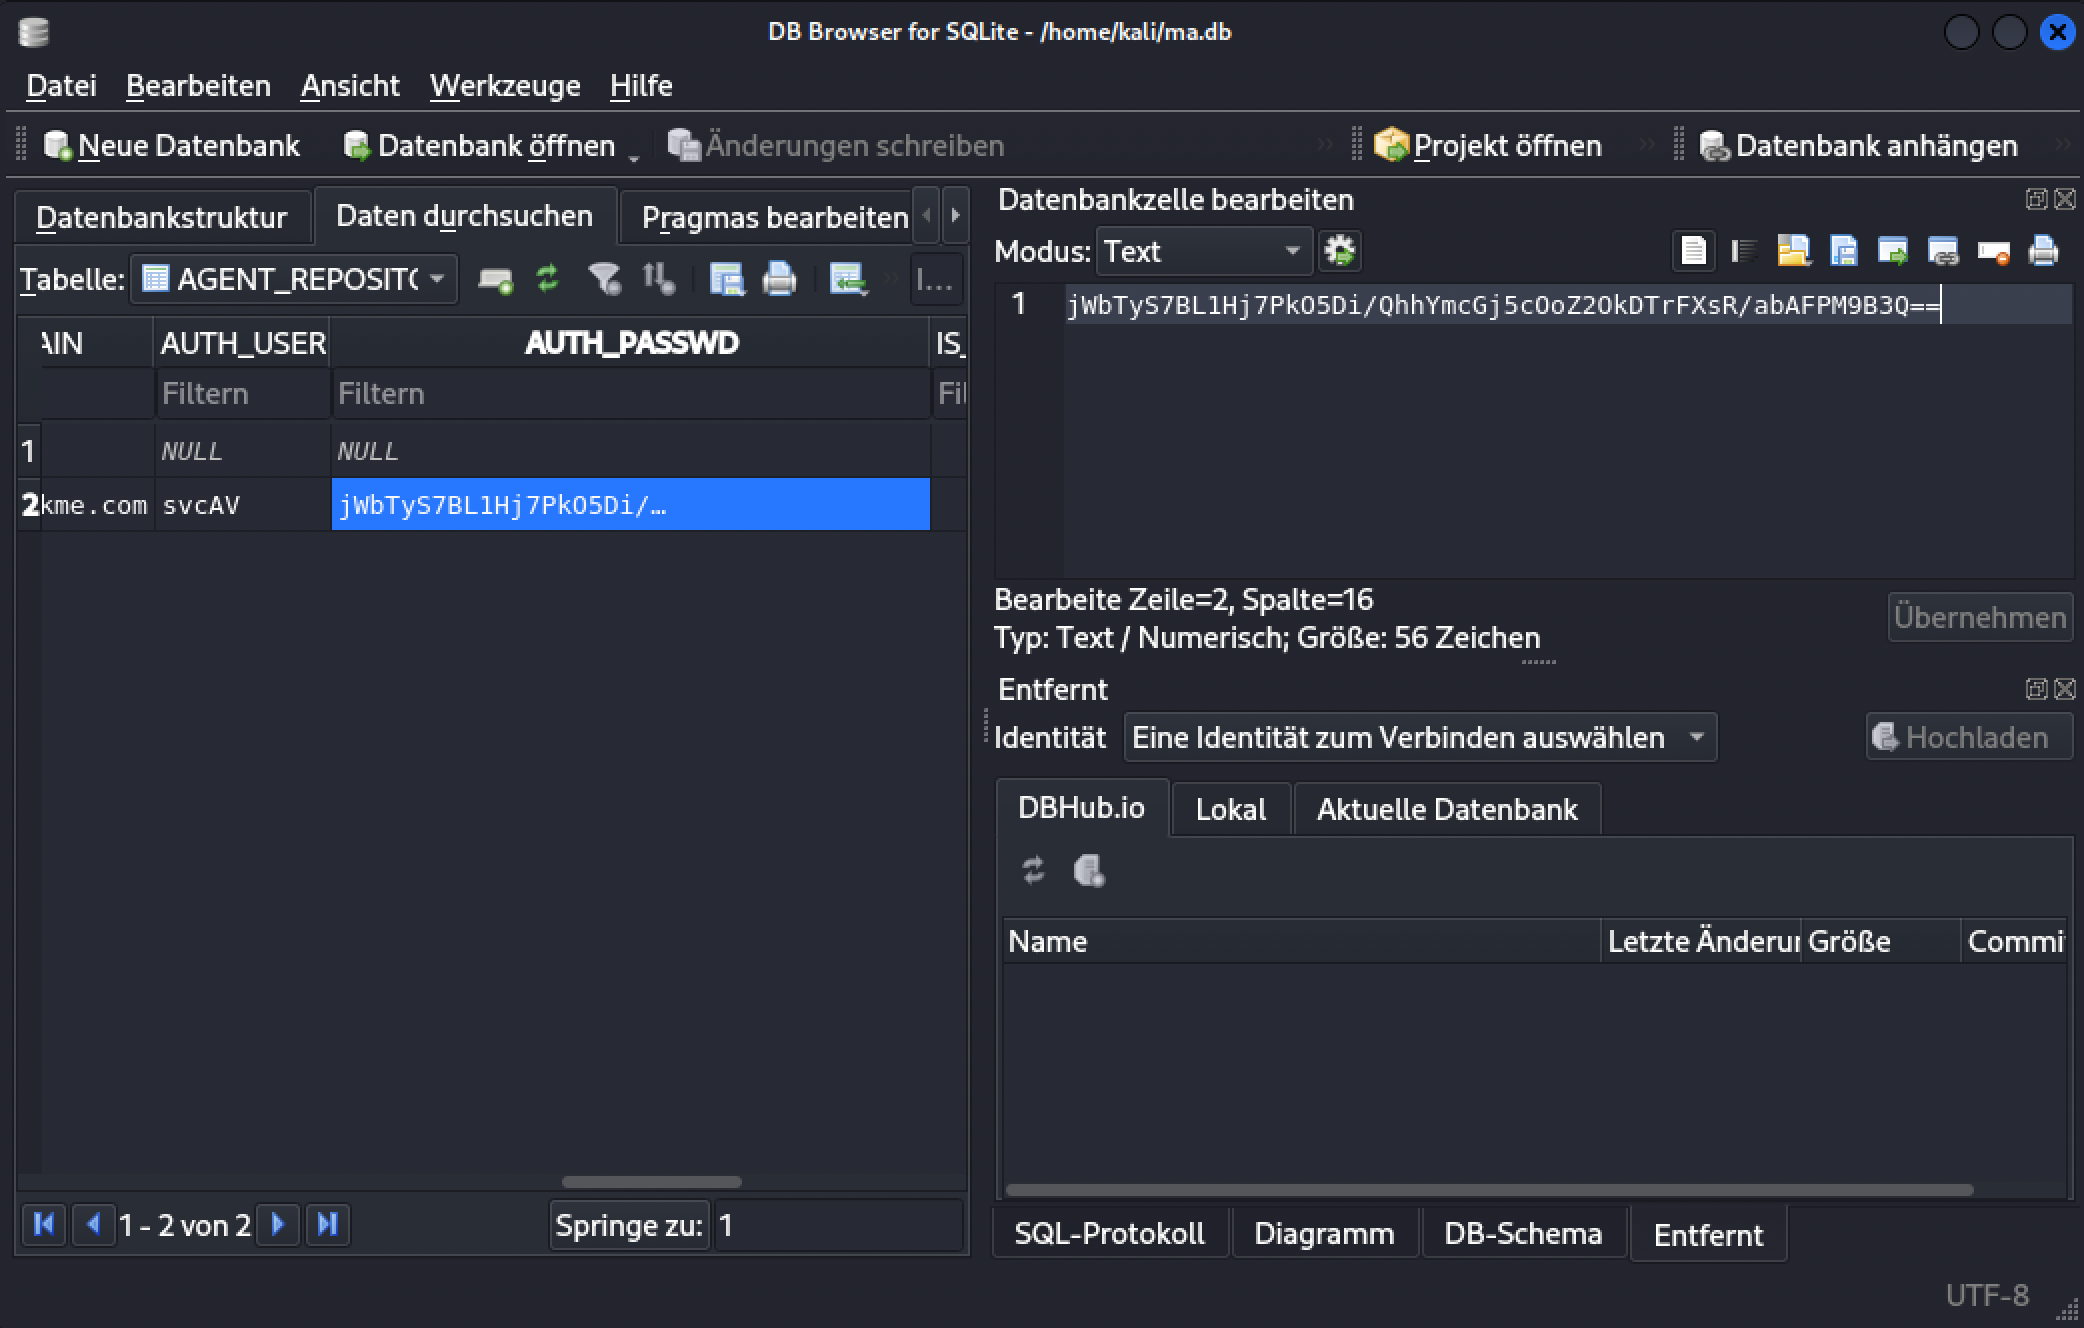
The password field isn’t hashed, it’s encrypted with a key McAfee has used long enough that public decryption scripts exist for it:
1
python2 mcafee_sitelist_pwd_decrypt.py <AUTH_PASSWD value>

Decrypted password: [redacted]. The lesson generalizes past McAfee specifically: any centrally deployed agent that needs standing credentials to call home is a local file away from handing them over, and the security model for that file usually rests on “nobody finds it,” not on the encryption itself being strong.
Part 2: Hardening Active Directory
Same domain concepts, opposite direction: this room is entirely Group Policy Management Editor and Microsoft’s own tooling, worked through the GUI on a Windows Server 2019 box rather than the terminal.
Securing authentication methods
LAN Manager hash. Windows can still generate the old, weak LM hash alongside the modern NT hash whenever a password under 15 characters gets set. LM hashes fall to fast brute-force. Turning that off:
1
Group Policy Management Editor > Computer Configuration > Policies > Windows Settings > Security Settings > Local Policies > Security Options > "Network security: Do not store LAN Manager hash value on next password change" > Define policy setting
SMB signing. Enforcing this closes the exact relay attack demonstrated with Responder above, a forged relay can’t reproduce a valid signature, so the server rejects the tampered request outright:
1
... > Security Options > "Microsoft network server: Digitally sign communications (always)" > Enable Digitally Sign Communications
LDAP signing. This is the direct countermeasure to the printer pass-back attack, once the domain controller requires signed LDAP requests, an attacker’s rogue LDAP server downgrading the negotiation to PLAIN/LOGIN cleartext auth no longer helps, because the domain controller now ignores any bind request that isn’t signed:
1
... > Security Options > "Domain controller: LDAP server signing requirements" > Require signing
Password rotation and policy. Three approaches for rotating service-account passwords specifically: a scheduled PowerShell script (full control, but you maintain the script yourself), adding MFA so rotation matters less, or Microsoft’s own Group Managed Service Accounts (gMSA).
What a gMSA actually is
The room’s own coverage of this is one sentence: Microsoft’s Group Managed Service Accounts rotate a service account’s password automatically every 30 days, so nobody has to remember to do it by hand. I looked up the rest since the room didn’t go further, a gMSA is a special AD account type for services that need standing credentials but shouldn’t have a static, human-set password, AD itself generates and rotates a long random password instead of an admin setting one. The direct payoff against something like the McAfee or MDT credential leaks above: even if that password leaks, it’s rotated out within 30 days at most, capping how long a stolen credential stays useful.
For regular user password policy, the room’s own recommendations: enforce at least 10 to 15 remembered old passwords in history, a minimum length of 10 to 14 characters, and complexity requirements (no account-name substrings, a mix of uppercase, lowercase, digits, and special characters).
Implementing the least privilege model
Three account types, each for a different purpose: regular user accounts for normal daily work, privileged accounts for admin tasks, and shared accounts (bare-minimum privilege, time-limited, used sparingly, e.g. for visiting contractors, never handed out as a full privileged account just because someone’s onsite for two weeks).
The Tiered Access Model structures this at the whole-domain level: Tier 0 is the top level, domain controllers, domain admin accounts, and the groups controlling them. Tier 1 is domain-joined servers and the applications running on them. Tier 2 is ordinary end-user devices. The core rule is that privileged credentials must never cross tier boundaries, a Tier 0 admin credential should never touch a Tier 2 workstation, because if it does, compromising that one low-value workstation compromises the entire domain behind it. Regular accounts audits (usage, privilege, and change audits, run periodically) are how an organization actually catches drift from this model before it becomes an incident.
Microsoft Security Compliance Toolkit
What the Microsoft Security Compliance Toolkit actually is
MSCT is Microsoft’s own free toolkit for applying and comparing security baselines without writing GPO settings by hand. It ships pre-built, Microsoft-recommended security baselines as ready-to-import Group Policy Object backups, one baseline set per supported Windows/Windows Server version, covering exactly the kind of settings discussed above (LM hash, SMB signing, password policy, and hundreds more). Rather than researching and configuring each setting individually, an admin downloads the baseline, extracts it, and runs the provided PowerShell script to apply it directly. The toolkit’s second piece, the Policy Analyser, solves a different problem: once an organization has accumulated GPOs at multiple levels (domain, OU, site), it’s easy to end up with conflicting or redundant settings between them. Policy Analyser compares GPOs against each other and flags exactly where they disagree, rather than an admin having to spot the conflict by hand.
Downloaded only from the official Microsoft site, extracted, and the relevant baseline run directly through PowerShell, or PolicyAnalyzer.exe for comparing GPOs already applied at different levels.
Protecting against known attacks
Kerberoasting. An attacker with any valid domain account can request a Kerberos service ticket for any service account, that ticket is encrypted with the service account’s own password hash, and the attacker can crack it offline afterward with no unusual traffic pattern generated in the process, since the request itself is entirely legitimate Kerberos activity. Mitigation: MFA as an extra authentication layer, and frequent rotation of Kerberos Key Distribution Center (KDC) service account passwords, which is exactly the gMSA use case above.
Weak and reused passwords. The room’s own attached VM includes a generated password-audit report showing which accounts share passwords with each other, a concrete illustration of why password-reuse auditing matters as its own ongoing practice, not just a policy on paper.
RDP brute-forcing. The room’s recommendation is blunt: never expose RDP directly to the public internet, put it behind a VPN or bastion host instead, and continuously audit for scanning or brute-force attempts against whatever remote-access path is actually exposed.
Publicly accessible shares. Misconfigured or unauthenticated SMB shares are a common lateral-movement foothold once an attacker is already inside. Get-SmbOpenFile in PowerShell is the room’s suggested first pass for finding shares that shouldn’t be as open as they are.
Defensive takeaways
Reading both rooms together makes the pairing obvious, almost every technique in Part 1 has a named, specific countermeasure in Part 2: SMB signing enforced (not just enabled) directly defeats the Responder relay, LDAP signing directly defeats the printer pass-back, and gMSA rotation directly caps how long a leaked service-account password (McAfee, or the MDT deployment account) stays useful even after it’s stolen. Password policy and MFA cut into the NTLM spraying angle specifically. The one gap I noticed working through both: neither room explicitly names a mitigation for the PXE/MDT credential leak itself, the closest the Hardening room gets is the general Tiered Access Model principle, that deployment service account shouldn’t sit at a tier where its compromise reaches domain admin, but that’s inference on my part connecting the two rooms, not something either room states directly.
The bigger point both rooms make in their own way: AD is critical infrastructure for the large majority of organizations running Windows, and every one of the five breaching techniques ended with one unprivileged, unremarkable account, no privilege needed, no vulnerability in the traditional sense. A printer with no admin password, a deployment tool doing exactly what it was designed to do, a security agent needing its own login, an app trusting a default password nobody rotated. That’s also why the attack surface for that first foothold isn’t a fixed list, new services get connected to AD constantly, and each one is a new way in until someone checks it against a baseline like MSCT or an audit catches it.
Lessons Learned
The technical range across the five breaching techniques was the real teaching point in Part 1, not any single exploit. NTLM spraying is a credentials problem, LDAP pass-back is a trust problem (a device authenticating outward with zero verification of the far end), Responder is a protocol-design problem (LLMNR/NBT-NS answering on trust), MDT/PXE is a convenience-versus-security tradeoff, and the McAfee database is a some-secret-has-to-live-somewhere problem. Five different root causes, one outcome each time. The MDT chain and the LDAP pass-back attack taught me the most, seeing a legitimate, deliberately-built deployment tool carry an extractable secret by design, and a device authenticating outward with zero verification of the far end, are patterns I’ll be watching for now, not just facts I read once.
Part 2 reframed a lot of that as “here’s the one setting that would have stopped it,” which made the hardening concepts stick a lot better than reading a generic best-practices list would have. Tiered Access Model was the one genuinely new concept for me, not because segmenting privilege is a novel idea, but because I hadn’t seen it laid out as a strict boundary specifically against credentials crossing tiers, which is a sharper, more testable rule than “limit admin access” on its own.